After a long break over the holidays, it is again time to update my blog with current work.
I will firstly cover my 3D Module, in which we are assigned to create not one, but 2 models! Rather than following the same path as last terms 3D work, I am expected to pay particular attention to detail within the actual model. But the catch is the model must be as low "Poly" as possible, which makes things a bit more tricky as the model is meant to be as accurate to the real thing as possible. I will even paint my own texture onto the model using software such as Adobe Photoshop. Basically I will create my very own model from scratch and aim to make it as life like as possible, without using default textures from 3DS Max.
So my first choice was a Handgun, but to avoid the simplicity of the model, this gun will be built out of individual pieces that will form together during an animation, and then fire while showing all the internal components working together. This gives me the opportunity to create a quite complex texture template, and also to an extent makes my work educational.
My second choice is a turtle, which I chose due to wanting to create something a bit different from classmates, and also lets me experiment with different types of texture creation. For example a form for scaly, shiny skin, but also a hard rough texture of the turtles shell.
Below is the process I went through when creating my Handgun. (Click image to enlarge)
Below:
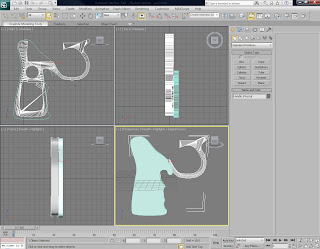
Firstly I sketch out the rough shape of the internal frame of the gun handle using the Line Tool, and then use the Extrude Modifier.
Below:
Then I add the Outer casing for the handle.
Below:
Then I add rough shapes for the basic components, such as the barrel, nose, sights and chamber.
Below:
These are then refined, and I cut out a curve at the back of the gun for the hammer to be placed.
Below:
I continue to add detail such as adding the hammer at the rear of the gun, hollowing out the barrel, and cutting the outer handle into 2 parts.
Below:
Yet more refinements and details are made, such as holes in the sights, a trigger and component for the bullet chamber to rotate upon.
Below:
The chamber can now rotate out of the gun, for loading. Bullet holes also added into the chamber.
Below:
Internal diameter of nose of gun is altered in order to refine number of bullet holes to 6, rather than 4 to add realism. Curves added to outside of barrel. Internal components added such as springs, dampers and other features that appear within a gun.
Below:
Additional features are added, like a switch to lock and open the barrel, indents and screws.
Below:
Bullets added to chamber.
Below:
I continue to use UVW Unwrap on each object until they are all textured, as seen here.
The internals of the handles are modeled to ensure a perfect fit when attached to the main gun:
Now the modelling is complete, I moved onto the animation aspect of the module. The idea is to show the gun being built up slowly out of all the available components, and then fire whilst showing the internals working together. Unfortunately due to time constraints and being limited to a length of time for the actual animation of both models, I decided to leave out this feature. I feel this may affect my marks as I initially promised to include this, but I did begin to notice all my time working within 3Ds Max was being eaten up by only one model. Although this may be poor time keeping on my part, I simply had to shift my attentions to the second model to ensure I did good job on both. I plan to develop this model further in my own time by coming back and adding the full promised animation.
The main aspect I took from this terms assignment was the method of using the "Unwrapping UVW" modifier. In all honestly I did struggle with learning a technique, but after trial and error and advice from my tutor, Ken Lau, I picked up a swift way of "Stitching" together to make textures appear to "Wrap" around ab object. In the end I didn't master the use of this modifier, as you can see below:

In the picture you can see some of the textures are stretched, but also the texture does not wrap around the whole object. This is a poorly textured example and a theme than crops up a few times on my objects. So this shows I still have a lot to learn with within Unwrapping and something I should focus my attentions on in future. I feel my modelling skills are also in need of refining, as much more detail could have been added, such as rust, damage or general wear. I did heavily edit the textures I used, but I do not claim myself to be an artist, so often resorted to manipulating free images from the Internet.
With the gun complete, I opted to focus now on my second object, the turtle.
Initially I tried to model each spine of the turtles shell, resulting in this shape below:
After I realised this would just take far more time than I had available, I opted to use a simpler, but more effective method. I simply drew out a flat eclipse and Cut sections into it, to match the shell in my drawings.
After this I extruded the polygons to create a staggered look to the shell.
After all the polygons was extruded, I applied the "Bend" modifier to create a rounded look.
I applied the same method to create the bottom half of the turtles shell.
After this I used the Bridge Tool to connect the top and bottom shell, and then beveled out shapes and cut holes for the head, feet and tail.
I added the necessary features such as head, feet and tail.
Again I unwrap the object and apply rough and natural looking textures, along with bump maps to make it look more realistic.
Looking back at the turtle I realised I did indeed end up spending far too much time on the gun model, and the turtle suffered because of it. Both the modelling and texture have come out very badly as again I simply ran out of time. This leads me to think I must manage my time much better in future, especially when working on multiple modules. It also raises the question If I have the skill, patience or enough artistic merit to enter the 3D industry, which looking at my second model, I require much more practice if I wish to do so.
There are alto of aspects I learned, but failed to implement into my video, such as any animation on my turtle, the IK Solver tool to make linked objects move fluidly together and I also used no bone rigging. I expect all these to have a huge impact on my grade for the module, which I accept as I did not mange my time well enough.
Over all I did enjoy this module very much, learning lots of new features along the way, namely the UVW modifier which seems a much more professional and practical way of texturing a model. I also learned I may not be cut out for the 3D industry, but at least I now know this is not where my passion may lie.